이번 실습은 Virtual Machine Scale Set 과 관련 있는 실습을 해보도록 한다.
Virtual Machine Scale Set 에 대한 이론적 지식이 필요하다면 아래글을 참고한다.
[MS Azure/Cloud Computing] - [Azure Computing] Virtual Machine Scale Sets
[Azure Computing] Virtual Machine Scale Sets
Azure 에서 제공하는 가상머신 확장 집합 기능에 대해 알아보고자 한다. 이 기능을 사용하는 이유는 트래픽의 증가와 감소를 유연하게 대처할 수 있고, 이는 곧 비용절감으로 이어지기 때문에
buildgoodhabit.tistory.com
아래와 같이 3파트로 나누어진 실습이다.
1. Azure Virtual Machine Scale Set: Deployment
2. Azure Virtual Machine Scale Set : Configuration
3. Install and Update App in Virtual Machine Scale Set
Azure Virtual Machine Scale Set: Deployment
Virtual Machine Scale Set 배포
1.Azure Portal에 로그인하고 Azure Cloud Shell을 엽니다.
2. Cloud Shell에서 코드 편집기를 시작하고 cloud-init.yaml 이라는 파일을 만듭니다.
3. 파일에 다음 텍스트를 추가합니다.
이 파일에는 Scale Set 에 있는 VM에 nginx 를 설치하기 위한 구성정도가 포함되어있다.

4. (MAC)Command + S 를 눌러 파일을 저장합니다.
5. 다음 명령을 실행하여 scalesetrg라는 이름으로 확장 집합의 새 리소스 그룹을 만듭니다.
az group create \
  --location westus \
  --name scalesetrg
Result
{
  "id": "/subscriptions/02387bdd-b3ed-422e-b187-4c7fa78215c3/resourceGroups/scalesetrg",
  "location": "westus",
  "managedBy": null,
  "name": "scalesetrg",
  "properties": {
    "provisioningState": "Succeeded"
  },
  "tags": null,
  "type": "Microsoft.Resources/resourceGroups"
}
6. 다음 명령을 실행하여 가상 머신 확장 집합을 만듭니다. 기본으로 Scale Set 에는 2 개의 Instance 와 1 개의 Load Balancer가 있다.
az vmss create \
  --resource-group scalesetrg \
  --name webServerScaleSet \
  --image UbuntuLTS \
  --upgrade-policy-mode automatic \
  --custom-data cloud-init.yaml \
  --admin-username azureuser \
  --generate-ssh-keys
Result
SSH key files '/home/------/.ssh/id_rsa' and '/home/------/.ssh/id_rsa.pub' have been generated under ~/.ssh to allow SSH access to the VM. If usingmachines without permanent storage, back up your keys to a safe location.
{- Finished ..
  "vmss": {
    "doNotRunExtensionsOnOverprovisionedVMs": false,
    "overprovision": true,
    "provisioningState": "Succeeded",
    "singlePlacementGroup": true,
    "uniqueId": "e50e8e37-435b-425e-9290-a37ae78e16ba",
    "upgradePolicy": {
      "mode": "Automatic"
    },
    "virtualMachineProfile": {
      "networkProfile": {
        "networkInterfaceConfigurations": [
          {
            "name": "webse3a3eNic",
            "properties": {
              "dnsSettings": {
                "dnsServers": []
              },
              "enableAcceleratedNetworking": false,
              "enableIPForwarding": false,
              "ipConfigurations": [
                {
                  "name": "webse3a3eIPConfig",
                  "properties": {
                    "loadBalancerBackendAddressPools": [
                      {
                        "id": "/subscriptions/02387bdd-b3ed-422e-b187-4c7fa78215c3/resourceGroups/scalesetrg/providers/Microsoft.Network/loadBalancers/webServerScaleSetLB/backendAddressPools/webServerScaleSetLBBEPool",
                        "resourceGroup": "scalesetrg"
                      }
                    ],
                    "loadBalancerInboundNatPools": [
                      {
                        "id": "/subscriptions/02387bdd-b3ed-422e-b187-4c7fa78215c3/resourceGroups/scalesetrg/providers/Microsoft.Network/loadBalancers/webServerScaleSetLB/inboundNatPools/webServerScaleSetLBNatPool",
                        "resourceGroup": "scalesetrg"
                      }
                    ],
                    "privateIPAddressVersion": "IPv4",
                    "subnet": {
                      "id": "/subscriptions/02387bdd-b3ed-422e-b187-4c7fa78215c3/resourceGroups/scalesetrg/providers/Microsoft.Network/virtualNetworks/webServerScaleSetVNET/subnets/webServerScaleSetSubnet",
                      "resourceGroup": "scalesetrg"
                    }
                  }
                }
              ],
              "primary": true
            }
          }
        ]
      },
      "osProfile": {
        "adminUsername": "azureuser",
        "allowExtensionOperations": true,
        "computerNamePrefix": "webse3a3e",
        "linuxConfiguration": {
          "disablePasswordAuthentication": true,
          "provisionVMAgent": true,
          "ssh": {
            "publicKeys": [
              {
                "keyData": "ssh-rsa AAAAB3NzaC1yc2EAAAADAQABAAABAQDB4JweasQ2dcWmFOR0oaw/EA7OqWc497NvG3SUEZr7JBksv/i2c6OhSylYw3RiPklQ2M2nuO/QR2jeaDc5P7AY0Dx/53I0piZZkltlfbhgkBFprMf6t7SLPQKOG/qahxQdYQYBqsNKRg2K+O1UYzrNOSn0v1p7wu5z1exo8F7aO25vJvceDth5fHjqYXoV/99vixCbOxEOtMPH5WoiDiBspIE20a6Pohum9CsuBEkXJCE9SUxdz1Ed4piIVe42+JPWErblqQSzx4a0SDF/1PHUtUiH9xmG3JZIHgFz+xWKXzfqrRMjq88ce2uOnJ4kZWHSOBQQ7jry9seKCsfbbNPd",
                "path": "/home/azureuser/.ssh/authorized_keys"
              }
            ]
          }
        },
        "requireGuestProvisionSignal": true,
        "secrets": []
      },
      "storageProfile": {
        "imageReference": {
          "offer": "UbuntuServer",
          "publisher": "Canonical",
          "sku": "18.04-LTS",
          "version": "latest"
        },
        "osDisk": {
          "caching": "ReadWrite",
          "createOption": "FromImage",
          "diskSizeGB": 30,
          "managedDisk": {
            "storageAccountType": "Premium_LRS"
          }
        }
      }
    }
  }
}
가상 머신 확장 집합 구성
1. 다음 명령을 실행하여 Load Balancer에 status probe를 추가합니다.status probe는 포트 80을 통해 웹 사이트의 루트에 ping을 보냅니다. 웹 사이트가 응답하지 않는 경우 서버는 사용할 수 없는 것으로 간주됩니다. 부하 분산 장치는 트래픽을 서버로 라우팅하지 않습니다.
az network lb probe create \
  --lb-name webServerScaleSetLB \
  --resource-group scalesetrg \
  --name webServerHealth \
  --port 80 \
  --protocol Http \
  --path /
Result
{
  "etag": "W/\"849d87a4-af14-483f-9466-46ef93f99fd4\"",
  "id": "/subscriptions/02387bdd-b3ed-422e-b187-4c7fa78215c3/resourceGroups/scalesetrg/providers/Microsoft.Network/loadBalancers/webServerScaleSetLB/probes/webServerHealth",
  "intervalInSeconds": 15,
  "loadBalancingRules": null,
  "name": "webServerHealth",
  "numberOfProbes": 2,
  "port": 80,
  "protocol": "Http",
  "provisioningState": "Succeeded",
  "requestPath": "/",
  "resourceGroup": "scalesetrg",
  "type": "Microsoft.Network/loadBalancers/probes"
}
2. 다음 명령을 실행하여 Load Balancer가 확장 집합의 인스턴스로 HTTP 트래픽을 라우팅하도록 구성합니다.
az network lb rule create \
  --resource-group scalesetrg \
  --name webServerLoadBalancerRuleWeb \
  --lb-name webServerScaleSetLB \
  --probe-name webServerHealth \
  --backend-pool-name webServerScaleSetLBBEPool \
  --backend-port 80 \
  --frontend-ip-name loadBalancerFrontEnd \
  --frontend-port 80 \
  --protocol tcp
Result
{
  "backendAddressPool": {
    "id": "/subscriptions/02387bdd-b3ed-422e-b187-4c7fa78215c3/resourceGroups/scalesetrg/providers/Microsoft.Network/loadBalancers/webServerScaleSetLB/backendAddressPools/webServerScaleSetLBBEPool",
    "resourceGroup": "scalesetrg"
  },
  "backendPort": 80,
  "disableOutboundSnat": null,
  "enableFloatingIp": false,
  "enableTcpReset": false,
  "etag": "W/\"6b101c7c-80a9-40c9-a13b-52aebdd0dc3c\"",
  "frontendIpConfiguration": {
    "id": "/subscriptions/02387bdd-b3ed-422e-b187-4c7fa78215c3/resourceGroups/scalesetrg/providers/Microsoft.Network/loadBalancers/webServerScaleSetLB/frontendIPConfigurations/loadBalancerFrontEnd",
    "resourceGroup": "scalesetrg"
  },
  "frontendPort": 80,
  "id": "/subscriptions/02387bdd-b3ed-422e-b187-4c7fa78215c3/resourceGroups/scalesetrg/providers/Microsoft.Network/loadBalancers/webServerScaleSetLB/loadBalancingRules/webServerLoadBalancerRuleWeb",
  "idleTimeoutInMinutes": 4,
  "loadDistribution": "Default",
  "name": "webServerLoadBalancerRuleWeb",
  "probe": {
    "id": "/subscriptions/02387bdd-b3ed-422e-b187-4c7fa78215c3/resourceGroups/scalesetrg/providers/Microsoft.Network/loadBalancers/webServerScaleSetLB/probes/webServerHealth",
    "resourceGroup": "scalesetrg"
  },
  "protocol": "Tcp",
  "provisioningState": "Succeeded",
  "resourceGroup": "scalesetrg",
  "type": "Microsoft.Network/loadBalancers/loadBalancingRules"
}
가상 머신 확장 집합 테스트
1. Azure Portal에서 왼쪽의 리소스 그룹 > scalesetrg 를 선택합니다.
2. webServerScaleSet 가상 머신 확장 집합을 선택합니다.
3. Overview 페이지에 표시된 Virtual Machine Scale Set의 Public IP 주소를 기록해 둡니다.
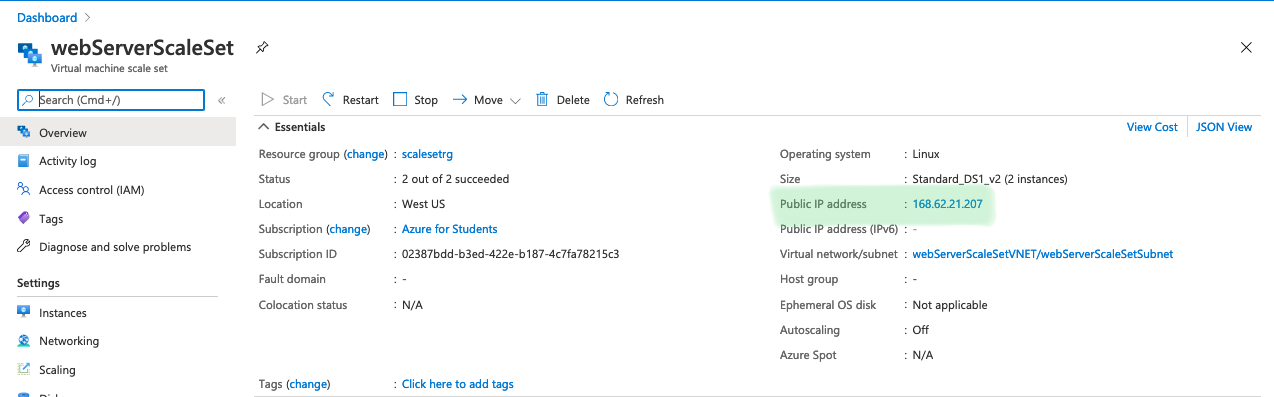
4. Settings 에서 Instance 를 선택합니다. 실행 중인 두 개의 VM이 확장 집합에 포함되어 있는지 확인합니다.

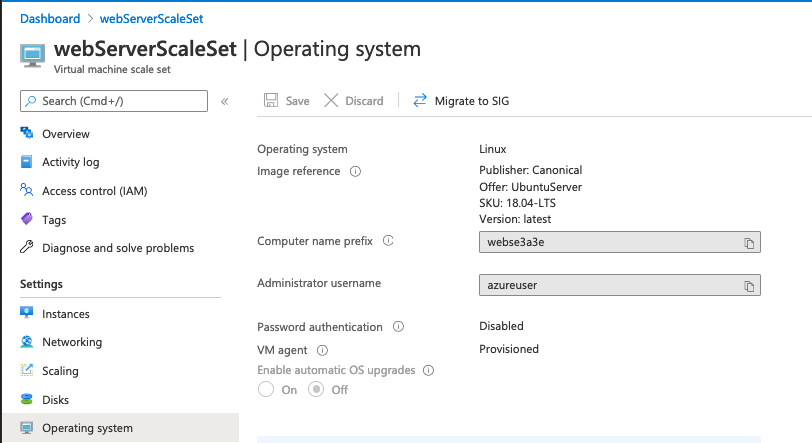
5. Operating System 을 선택합니다. VM이 Ubuntu Linux를 실행하고 있는지 확인합니다.
6. 웹 브라우저에서 확장 집합의 공용 IP 주소로 이동합니다. Hello World from Virtual Machine Scale Set !이라는 메시지가 표시되는지 확인합니다.
Azure Virtual Machine Scale Set : Configuration
예시 시나리오에서 고객이 회사 웹 사이트 중 하나를 사용하여 배송 상태를 관리하고 확인한다는 사실을 떠올려 보세요. 이 웹 사이트는 VM에 배포되고 온-프레미스에서 호스트됩니다.
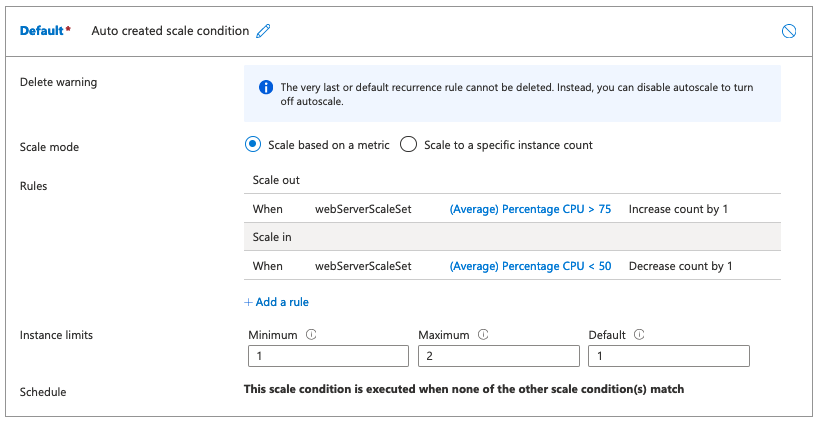
VM의 전체 CPU 사용량이 75%를 초과하면 웹 사이트 사용자의 응답 시간이 상당히 지연되는 것을 알 수 있습니다. 시스템이 이 임계값에 도달하면 웹 애플리케이션을 호스트하는 가상 머신 확장 집합이 수평적으로 크기 조정되어야 합니다. 비용을 절감하려면 수요가 줄어들고 확장 집합의 전체 CPU 사용량이 50% 아래로 떨어질 때 다시 축소되어야 합니다.
이 연습에서는 자동 크기 조정을 구성합니다. 시스템의 CPU 사용량에 따라 확장되었다가 다시 축소되는 크기 조정 규칙을 정의합니다.
확장 규칙 만들기 Scale-out
1. Azure Portal에서 로 이동합니다.
2. Virtual Machine Scale Set 의 Settings 에서 Scaling 을 클릭합니다.
3. Custom autoscale 클릭
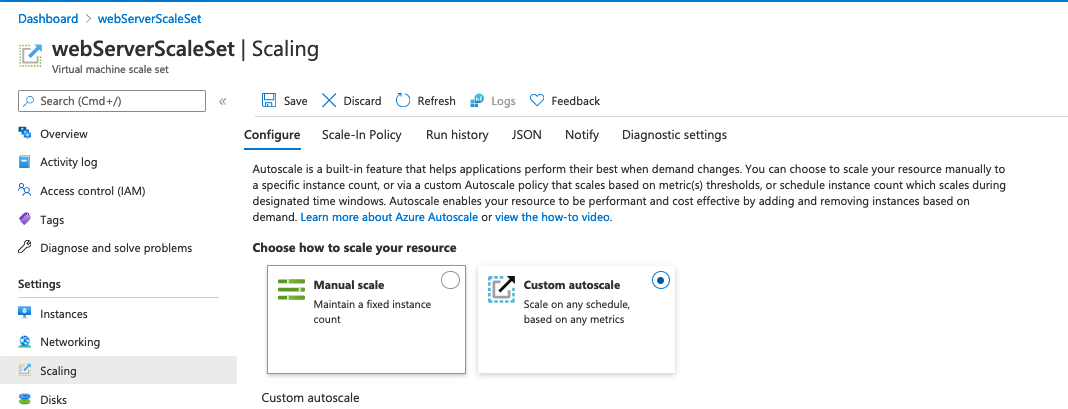
4. Scale Mode 가 "Scale based on a metric"으로 설정되어 있는지 확인 후 "+Add a rule"를 클릭합니다.

5. Scale Rule 에서 아래와 같이 세팅해준다.

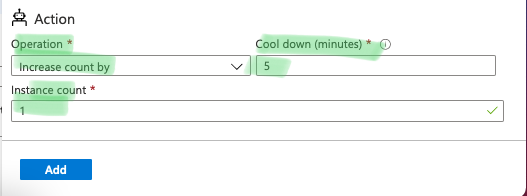
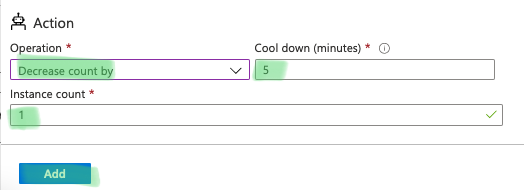
축소 규칙 만들기 Scale-in
1. Scale Mode 가 "Scale based on a metric"으로 설정되어 있는지 확인 후 "+Add a rule"를 클릭합니다.
2. Scale Rule 에서 아래와 같이 세팅해준다.

Result
Install and Update App in Virtual Machine Scale Set
배송 회사 시나리오에서 Virtual Machine Scale Set 을 만들어 웹 애플리케이션을 설치했습니다. 이제 확장 집합의 모든 VM에서 웹앱을 업데이트하고 새 버전을 설치해야 합니다.
Roll out이 진행되는 동안 시스템은 사용 가능한 상태를 유지해야 합니다. 가용성을 보장하는 좋은 방법은 사용자 지정 스크립트 확장을 사용하여 업데이트를 수행하는 것입니다. Virtual Machine Scale Set 에 이 스크립트를 적용합니다. 확장 집합은 한 번에 하나의 VM에 업데이트를 적용하므로 다른 VM은 계속 실행됩니다.
이 연습에서는 사용자 지정 스크립트 확장을 사용하여 웹앱의 새 버전을 Roll out합니다. nginx 서버에서 제공하는 메시지를 편집합니다. 대규모 업데이트에도 동일한 방법을 사용할 수 있습니다.
사용자 지정 스크립트 확장을 사용하여 업데이트 배포
1. Azure Portal에서 다음 명령을 실행하여 확장 집합의 현재 업그레이드 정책을 확인합니다.
업그레이드 정책이 Automatic으로 설정되어 있는지 확인합니다. 이 정책은 첫 번째 랩에서 확장 집합을 만들 때 지정했습니다. 정책이 Manual이라면 VM 변경 사항을 직접 적용해야 합니다. 정책이 Automatic이므로 사용자 지정 스크립트 확장을 사용할 수 있고 Scale Set이 업데이트를 수행하도록 할 수 있습니다.
az vmss show \
    --name webServerScaleSet \
    --resource-group scalesetrg \
    --query upgradePolicy.mode
Result
"Automatic"2. 다음 명령을 실행하여 업데이트 스크립트를 적용합니다.
az vmss extension set \
    --publisher Microsoft.Azure.Extensions \
    --version 2.0 \
    --name CustomScript \
    --vmss-name webServerScaleSet \
    --resource-group scalesetrg \
    --settings "{\"commandToExecute\": \"echo This is the updated app installed on the Virtual Machine Scale Set ! > /var/www/html/index.html\"}"
업데이트된 웹 애플리케이션 테스트
1. 다음 명령을 실행하여 Scale Set Load Balancer의 IP 주소를 검색합니다.
az network public-ip show \
    --name webServerScaleSetLBPublicIP \
    --resource-group scalesetrg \
    --output tsv \
    --query ipAddress
2. 웹 브라우저에서 확장 집합 부하 분산 장치의 공용 주소로 이동합니다. This is the updated app installed on the Virtual Machine Scale Set!(Scale Set 에 설치된 업데이트된 앱입니다.)라는 메시지가 표시되는지 확인합니다.

Reference
출처 1 : docs.microsoft.com/ko-kr/learn/modules/build-app-with-scale-sets/
가상 머신 확장 집합을 사용하여 확장성 있는 애플리케이션 빌드 - Learn
애플리케이션이 가상 머신 확장 집합을 사용하여 변경 사항에 맞게 자동으로 조정되는 한편 비용을 최소화하도록 지원하세요.
docs.microsoft.com
출처 2 : docs.microsoft.com/ko-kr/azure/virtual-machines/linux/using-cloud-init
Azure의 Linux VM에 대한 cloud-init 지원 개요 - Azure Virtual Machines
Azure에서 프로비저닝 시간에 VM을 구성하는 cloud-init 기능의 개요입니다.
docs.microsoft.com

내용이 도움이 되셨다면 블로그 구독하기 부탁드리겠습니다.
* 이 글의 모든 저작권은 aliceintr에 있으며 무단 배포 및 사용은 자제해 주시기 바랍니다. *
'MS Azure > AZ104' 카테고리의 다른 글
| [Update 2024] AZ 104 : Azure Administrator Associate 시험 후기/ 공부방법/자료 (104) | 2021.02.08 |
|---|---|
| AZ 104 실습 : [Computing] Generalized VM image (0) | 2021.01.27 |
| AZ104 : [Storage] Azure Files에 저장된 파일에 대한 액세스 보호 (0) | 2021.01.20 |
| AZ104 실습 : Azure Files Shares 만들기 및 연결 (0) | 2021.01.20 |
| AZ104 실습 : Azure Storage Data Redundancy Failover testing (0) | 2021.01.19 |